17 Searching and Comparison of Fingerprint Techniques

1. Learning Outcomes
In this module, we shall be focusing on the importance of most important evidence in personal identification i.e; fingerprints. The students will learn basic types of fingerprints like patents, latents and plastic prints. How they are formed on surfaces and how should they be lifted or collected from different porous/ non-porous surfaces. Students will learn how to search for, collect and process them for further comparison and analysis in this module.
2. Introduction
Fingerprint classification is an important step in any fingerprint identification system because it significantly reduces the time taken in identification of fingerprints especially where the accuracy and speed are critical. To reduce the search and space complexity, a systematic partitioning of the database into different classes is highly essential. Fingerprints can be found on any non-absorbent surface. Fingerprints can be classified into three categories according to the type of surface on which they are found and whether they are visible or not. Fingerprints on soft surfaces (such as soap, wax, wet paint, fresh caulk, etc.) are likely to be three- dimensional plastic prints; those on hard surfaces are either patent (visible) or latent (invisible) prints. Visible prints are formed when blood, dirt, ink, paint, etc., is transferred from a finger or thumb to a surface. Patent prints can be found on a wide variety of surfaces: smooth or rough, porous (such as paper, cloth or wood) or nonporous (such as metal, glass or plastic).
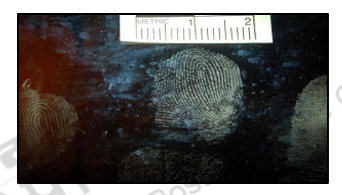
Latent prints are formed when the body’s natural oils and sweat on the skin are deposited onto another surface. Latent prints can be found on a variety of surfaces; however, they are not readily visible and detection often requires the use of fingerprint powders, chemical reagents or alternate light sources. With this, we now need to know where to look for fingerprints at a scene of crime. Patent prints are collected using a fairly straightforward method which is; photography. These prints are photographed in high resolution with a forensic measurement scale in the image for reference. Investigators can improve the quality of the images by using low-angle or alternate light sources and/or certain chemicals or dyes during photography.
One of the most common methods for discovering and collecting latent fingerprints is by dusting a smooth or non-porous surface with fingerprint powder (black granular, aluminum flake, black magnetic, etc). If any prints appear, they can be photographed as mentioned above and then lifted from the surface with clear adhesive tape. The lifting tape is then placed on a latent lift card to preserve the print. However, fingerprint powders can contaminate the evidence and ruin the opportunity to perform other techniques that could turn up a hidden print or additional information. Therefore, investigators may examine the area with an alternate light source or apply cyanoacrylate (super glue) before using powders.
Once the fingerprints are lifted, collected or photographed, further comparison and analysis is done. Fingerprint examinations may be conducted by forensic scientists, technicians or police officers; however, the examiner should have the proper training and experience to perform the task. In many forensic science laboratory (central and state) this is done in separate division dedicated to examination of dermatoglyphic.
3.1. Location
Fingerprint evidence left behind by a suspect or victim may identify who was at a crime scene and what he or she touched. However, it is important for defence attorneys to know, and to inform the jury, that the techniques used to locate and identify fingerprints are far from a perfect science. An understanding of how fingerprints are located and lifted can help attorneys recognize if a flawed analysis was performed by investigators or lab technicians. Further, knowledge of the various fingerprint collection techniques is essential to successful cross-examination of crime scene technicians and fingerprint examiners. Locating a fingerprint often requires a vigilant and calculated search. However, in circumstances where the print is visible to the naked eye, finding a fingerprint is relatively easy. The more intricate searches take place when the print is present on a surface but not visible. The type of fingerprint left behind usually determines the amount of time and effort investigators must put into locating the print. This module attempts to provide an overview of the techniques used to locate, lift, and identify a fingerprint.
3.2. Lifting/ Photographing
Investigators often follow a two-phase process when searching for fingerprints. The first phase involves looking for patent and plastic prints since they are visible. Often times, a flashlight is used during this phase.
The second phase involves a blind search for latent prints. To narrow the search, investigators usually focus on the entry and exits points that the suspect used and any items that appear to have been disturbed, such as overturned lamps or possible weapons. The type of surface being searched for fingerprints often determines the technique employed by investigators. There are porous, non-porous and semi-porous surfaces encountered invariably at any scene of crime. These are as follows:
a. Porous Surfaces:
i. Investigators often use chemical methods to locate the print such as iodine fuming, silver nitrate, or ninhydrin. When one of these chemicals comes into contact with the chemicals present in the fingerprint residue (natural oils, fats), the print become visual.
ii. Iodine fuming takes place in a fuming chamber. The process works by heating up solid crystal iodine which creates vapours that adhere to the oily residue of print, producing a brown coloured print. One of the drawbacks of using iodine fuming is that the print fades quickly after the fuming takes place and therefore must be photographed quickly. Alternatively, if the print is sprayed with a starch and water solution, it can be preserved for several weeks.
iii. In Silver nitrate method, latent prints when exposed to silver nitrate in the presence of sunlight reacts with the chloride of the salt molecules found in print residue, forming silver chloride. When exposed to ultraviolet light, silver chloride turns black or brown, making the print visible. This method works particularly well on impressions left in cardboard and paper-like surfaces.
iv. Ninhydrin is more commonly used than iodine fuming and silver nitrate techniques to locate a latent print. The object on which the print is located can be dipped in or sprayed with a ninhydrin solution, which reacts with the oils in the print’s residue to create a bluish print. One of the drawbacks of using ninhydrin is that the reaction is very slow, often taking several hours for the print to become visible. To accelerate the reaction, the object containing the print can be heated to 80 to 100 degrees Fahrenheit.
v. A variety of other techniques are sometimes used. For example, laser illumination creates a contrast between the print and the surface which exposes the print.
vi. One of the difficult surfaces is human skin where fingerprints are present in violent crimes. The first major obstacle is finding the print since the oily residue left by fingers that creates the fingerprint itself is often present on human skin, making it difficult to create a contrast between the surface (skin) and the print. Further, after a print is left on human skin, the oily residue often disperses and is absorbed into the skin, blurring the print. Two hours is the maximum amount of time that a print on skin may be viable.
vii. Amido Black, a non-specific protein stain that reacts with any protein present, is typically used for developing or enhancing bloody impressions on human skin. To reveal prints on clothing, high-tech methods such as vacuum metal deposition using gold and zinc are showing promise for the investigator.
b. Nonporous Surfaces:
- A powder technique is usually used to identify latent prints on nonporous surfaces such as glass, marble, metal, plastic, and finished wood. When powder is distributed on the surface, it adheres to the residue deposited from the finger’s touch, allowing investigators to find the print. Often times, to avoid smudging the print, a magnetic powder technique is used in which the powder is poured on the surface and then spread evenly over the surface using a magnetic force instead of spreading the powder with a brush. The colour of the powder should contrast with the surface that is being searched to allow better visibility. For example, the investigator should use a white or grey powder if searching a black marble countertop for prints.
- Another popular technique for fingerprint location and identification used by both lab technicians and investigators at the crime scene is superglue fuming. Superglue fuming is a chemical process that exposes and fixes fingerprints on a nonporous surface. In the lab, the process works by using an airtight tank, known as a fuming chamber, to heat up superglue (liquid cyanoacrylate) which releases gases that adhere to the oily residue of print, thereby creating an image of the fingerprint. Superglue fuming can also be performed at the crime scene. Superglue fuming performed at the crime scene can be vital to preserve prints on items that are being sent to the lab via mail. One of the drawbacks is that if the evidence is fumed too long, it can distort the print, rendering it useless.

A chamber specially designed for exposing latent prints to super glue fumes. (Courtesy of Scott Campbell, Ron Smith & Associates)
Super glue fumes adhere to latent fingerprints on the neck of a glass bottle. (Courtesy of Scott Campbell, Ron Smith & Associates)
c. Different Techniques Employed:
i. Alternate Light Source (ALS): It is becoming more commonplace for investigators to examine any likely surfaces (doors, doorknobs, windows, railings, etc.) with an alternate light source. These are laser or LED devices that emit a particular wavelength, or spectrum, of light. Some devices have different filters to provide a variety of spectra that can be photographed or further processed with powders or dye stains. For example, investigators may use a blue light with an orange filter to find latent prints on desks, chairs, computer equipment or other objects at the scene of a break-in.

ii. Chemical Developers: Porous surfaces such as paper are typically processed with chemicals, including ninhydrin and physical developer, to reveal latent fingerprints. These chemicals react with specific components of latent print residue, such as amino acids and inorganic salts. Ninhydrin causes prints to turn a purple colour, which makes them easily photographed. DFO (1,8-diazafluoren-9-one) is another chemical used to locate latent fingerprints on porous surfaces; it causes fingerprints to fluoresce, or glow, when they are illuminated by blue-green light.
iii. Phase Transfer Catalyst (PTC) The weak or no development of latent prints may be due to the difference in phases of reagent (aqueous) and the residue (sebaceous). PTC is a heterogeneous catalysis, where a catalyst facilitates the migration of a reactant from one phase to another. It comprises of a hydrophilic phase, a hydrophobic phase and an inter- phase. The ion gets transferred from the aqueous to the organic phase. It involves formation of a metal carbanion at the inter-phase. The method is efficient for both, porous and non porous surfaces.
iv. Small Particle Reagent (SPR) SPR is a popular and an advantageous physical development technique to detect latent fingerprints on non porous, wet surfaces. SPR is basically a suspension of very fine insoluble powder in a dilute aqueous solution of a surfactant. It relies on the adhesion between fatty components present in traces and the hydrophobic tails of the reagent. These tails are linked to a hydrophilic head, which adheres to the metal salt to give a precipitate. Suspension is generally applied by immersion or spraying method. Small particle reagent technique, also known as the wet powdering method, is an effective technique for moist surfaces, where other eccrine secretion sensitive reagents fail.
v. Like fingerprint powders, chemical processing can reduce the investigator’s ability to perform other techniques that could reveal valuable information. Therefore, any non-destructive investigations are performed before the evidence is treated with chemicals. For example, a ransom or hold-up note will be examined by a questioned documents expert before being treated with ninhydrin, since some formulations of ninhydrin will cause certain inks to run, thus destroying the writing.
Lifting Of the Prints:
Lifting a fingerprint is to make a permanent impression of the fingerprint. Lifting a print can be accomplished on either flat surfaces or round surfaces. Lifting a print usually involves a rubber tape with an adhesive surface which is applied to the fingerprint, leaving an imprint on the tape. Often times, a flat object, such as a ruler, will be slowly swiped across the top of the tape to ensure that there are no bubbles or ripples in the tape that will affect the imprint. Next, the tape is carefully peeled off the surface and a plastic cover is placed on the adhesive side of the tape to prevent disruption of the print. Identification information and a description of the location of the print should be written on the back of the tape or card. After the print is lifted, it is converted into digital data that can be modified to create a clearer image.
Photographing the Prints:
After the print is located, it is vital that it is photographed before it is lifted. A photograph captures where the print was located in comparison to other objects and captures the orientation of the print. Further, a photograph can serve as a key piece of identification of a patent or plastic print and can be used to compare and possibly match the print to its source. Photographing the print’s location at the crime scene also guards against tampering of evidence.
3.3. Comparisons/ Analysis
Fingerprint analysis is usually performed by law enforcement agencies or crime laboratories; however, casework may be sent to private companies if there is a need, such as to reduce backlogs, verify results, or handle high-profile cases. Fingerprint examination involves looking at the quality and quantity of information in order to find agreement or disagreement between the unknown print (from the crime scene) and known prints on file. To conduct the examination, fingerprint examiners use a small magnifier called a loupe to view minute details (minutiae) of a print. A pointer called a ridge counter is used to count the friction ridges. The Fingerprint Analysis Process includes analysis, comparison, and evaluation and verification method to reach a determination on each print.
a. Analysis
Analysis involves assessing a print to determine if it can be used for a comparison. If the print is not suitable for comparison because of inadequate quality or quantity of features, the examination ends and the print is reported as not suitable. If the print is suitable, the analysis indicates the features to be used in the comparison and their tolerances (the amount of variation that will be accepted). The analysis may also uncover physical features such as recurves, deltas, creases and scars that help indicate where to begin the comparison.
The expert needs to look for the respective placing of these ridge characteristics on both crime scene as well as suspect’s fingerprints for matching. This of course is done once, the patterns analysed to be same like both prints showing whorl patterns or arch or loop etc.
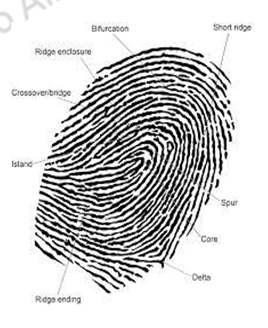
Ridge characters which distinguish one’s fingerprints from another
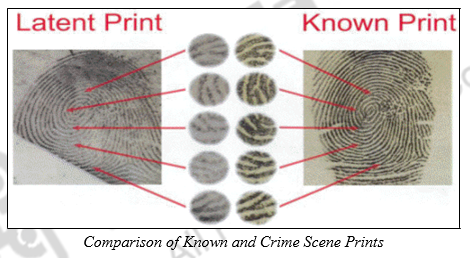
b. Comparisons are performed by an expert who views the known and suspect prints side-by- side. The expert compares minutiae characteristics and locations to determine if they match. Known prints are often collected from persons of interest, victims, others present at the scene or through a search of one or more fingerprint databases such as the FBI’s Integrated Automated Fingerprint Identification System (IAFIS). In India, NCRB (National Crime Records Bureau) has undertaken the work of making an exhaustive fingerprint database.
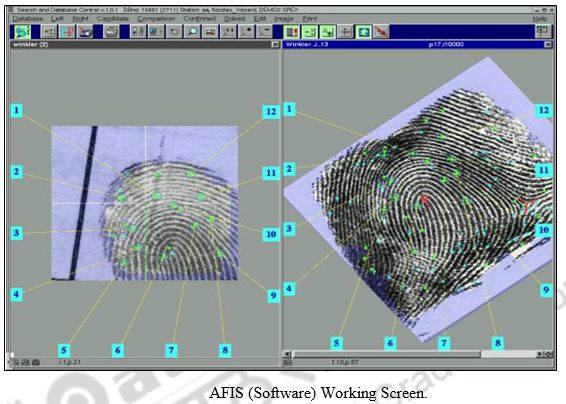
The fingerprints are scanned and entered into the system called AFIS (Automated Fingerprint Identification System) where these are electronically matched and results are shown in seconds. Automated fingerprint identification is the process of automatically matching one or many unknown fingerprints against a database of known and unknown prints. Automated fingerprint identification systems are primarily used by law enforcement agencies for criminal identification initiatives, the most important of which include identifying a person suspected of committing a crime or linking a suspect to other unsolved crimes. Automated fingerprint verification is a closely related technique used in applications such as attendance and access control systems. On a technical level, verification systems verify a claimed identity (a user might claim to be John by presenting his PIN or ID card and verify his identity using his fingerprint), whereas identification systems determine identity based solely on fingerprints.
c. Evaluation
Evaluation is where the examiner ultimately decides if the prints are from the same source (identification or individualization), different sources (exclusion) or is inconclusive. Inconclusive results may be due to poor quality samples, lack of comparable areas, or insufficient number of corresponding or dissimilar features to be certain. In such cases, either further material requisition is sent to the party or the case report is finalised quoting ‘non-sufficient matter’.
d. Verification
Verification is when another examiner independently analyzes, compares and evaluates the prints to either support or refute the conclusions of the original examiner. Once the two prints are compared and evaluated the expert along with attorney, may work upon its verification especially for the court proceedings. This may be done by marking chain of custody and other relevant information regarding the authenticity of the evaluated fingerprints to say that it belongs to the accused which means his presence at the scene is verified. The examiner may also verify the suitability of determinations made in the analysis phase. This entire process of collection, development, photography and comparison of fingerprints is done to present the result of either ‘does not match’ or ‘matches’ in the court room for plausible conviction or acquittal of suspect.
4. Summary
In this module students have learnt about the various fingerprints lifting and developing techniques from porous and non-porous surfaces. Most importantly they have understood the science of comparison of two fingerprints. Forensic science is based on the fundamental principle of comparison and individualization. And fingerprints are the most important of all evidences that need to be searched for at a crime scene, evaluated and compared with suspect’s prints. The comparison of fingerprints was earlier done by experts manually which left a chance for occurrence of human error, however nowadays, this is done electronically using sophisticated software’s such as AFIS for evaluation and comparison. The final report is presented in the court of law.
| you can view video on Classifications for searching finger prints |